Showing posts with label do it yourself. Show all posts

Too-Large Dress Refashion: Success!

(This isn't a tutorial, just a quick show-and-tell on my refashion)

A coworker kindly donated a dress to me. It was the perfect challenge for my refashion project being that it was a few sizes too large and would require a completely new neckline, redoing the entire zipper, and hiding tear and wear. Necklines are my enemy, but I conquered it with conviction and won. The zipper and other issues ain't got nuthing on me!

Man, my photos are terrible.

Here's the before photo. I have yet to conquer selfies.


I chopped off the neck and a few inches from the shoulders, then created a new neckline. Side view.


From scrap fabric, I cut facing and attach interface. TUTORIAL on facing :)


Attach.


Redo zipper, shorten hem and what what! Done!


DIY long circle skirt (tutorial) - my $14 skirt


I haven't sewn in awhile due to my kitty passing away and another being really sick. Today I made a skirt I've been meaning to make months ago when I saw this pin.


I found this coral fabric at my newly discovered fabric store for $2.50 a yard. Never could I get something like this at Joann for this cheap, even on sale. I've learned never to go to Joann again for fabric or ... anything. Last time I bought fabric there, they cut it 3" too short.


I wanted to add a little bling to the waistband so when I found this lace (also at my new fabric store) for $1.50 a yard, I nearly passed out and bought 3 yards. If I had more money I would have gotten 100. Just kidding.


My total cost for this project was $14!
$7.50 for 3 yards of fabric
$3 for zipper
$2 for lining fabric
$1.50 for a yard of lace

*************************

Let's get started.

1. Figure out your measurements.
Unless you use a bed sheet, your fabric will not be large enough to cut a whole circle skirt from. You'll need to cut 2 half circles. Here are 2 methods to cutting. I find I can save fabric and money if I cut using Method #2 because fabric is pretty expensive, I'm cheap and I need money for my cat's vet bills.


2. Figure out your half circles.


3. Cut a lining fabric the same way as the outside fabric, but shorter.
The length depends on you. I made it short so I could save fabric.

4. Hem the bottoms of both the main fabric and the lining.
You can do a standard hem for the bottom. I used a rolled hem on my serger, which turned out to be even more amazing than sliced bread. This was so quick and easy—I left it exposed as it was beautiful like that and it won't fray.


5. Sew the two half circles together on one side. Do the same for the lining.


6. Sew the lining and the main fabric together at the waist.
Remember that both of them should have one side still open. This is where the zipper will go.


7. Attach the lace waistband.
The lace should be at least your waist measurement (or wherever you want the skirt to sit) plus 1-2 inches.


When I sew on the lace, I go in a zig zag pattern, following the lace's pattern. This will make the waistband sturdier and won't be visible.


8. Now, attach your zipper on the open side.
I used an invisible zipper so it won't show that much. This was a pink zipper since I couldn't find a matching zipper for my fabric. Make sure your fold the lace under like the photo so it won't fray.


After attaching the zipper, the last thing to do is sew the rest of the side of the skirt together.


DIY split-back bow shirt (tutorial)


A few weeks ago, I was perusing Joann when I saw a chiffon fabric with bird patterns I knew my sister would love. Unfortunately, it was $14/yard. That was ridiculous. I know Joann always mark up their prices so I waited for a sale. I got 1.3 yards for my sister and attempted to make her a split-back shirt with a bow in the back.


This shirt is incredibly simple.

First, cut one front and one back piece in the shape of a loose tank top. Cut an A shape in the middle of the back piece.


Take the top inner corners and overlap them slightly like pictured. This will allow you to sew them together and let you have a base for attaching the bow later.


Hem the bottom, arms and neckline. Sew the two pieces together at the shoulders and sides.


For the bow, I cut TWO rectangular pieces. Because chiffon is too flimsy and will not stand on its own, I ironed on interfacing to make it stiffer. Follow the directions on your interfacing package for this step as there are different types of interfacing. Mine is fusible interfacing, which means I had to iron it on. Make sure you attach the interfacing on the WRONG side of the fabric. Do this to both pieces.


Now lay the two pieces with the WRONG sides (with interfacing attached) facing each other. Fold the sides inward and sew the two pieces together. There are many ways to do this, so do it the way you prefer. You basically just want a "closed" pillow case.


Take a small piece of scrap fabric and wrap it around the bow at the middle. Make sure it's long enough to have a small piece sticking out so you can attach it to the shirt.


Sew it to the shirt with a simple straight stitch.


Done!

And wear it.


DIY triangle shirt

One of my babies passed away a week ago. Since then, I've thrown myself into sewing as a distraction. Sometimes not having anyone to talk to or hug gets pretty lonely. Sewing helps keep me busy. Here's a triangle shirt I made for my sister. I saw her pin it on Pinterest and thought it wasn't too hard to make.

She's so purdyyy.


Here's what I did. It's not a thorough walk through, but I wanted to show how I figured this shirt out. I didn't use a tutorial so all my projects are mostly just me figuring these out.

I used a jersey knit for the inside and a chiffon for the flowy triangle.

For the inside:
Cut a tank top that fits you. I used half a yard because my sister is petite. It fits close to her body. I think making it looser would look cuter so use more fabric if you're not cheap like me. I used a tank top that fits her and used it to cut a new one. Hem and sew everything together EXCEPT for the neckline.


For the outside:
Get a piece of rectangular fabric and fold in half. Make sure that it's 2x longer than your desired length. For example, if you need the shirt to be 30 inches long (from shoulders to triangle tip at bottom), double that and get 60 inches.


Mark the middle of the fabric at the bottom (from the left side to the right side). That's where the tip of the bottom of the shirt will be. Draw a triangle from the top left corner to the bottom tip to the right top corner, as shown in the drawing. Lay the tank top under the triangle where you want. I placed it slightly to the right because I wanted an asymmetrical shirt. Cut a neckline into the triangle exactly like your tank top.


Combine:
Sew the triangle and tank top together at the neckline. Remember to hem the triangle fabric as well.


DIY Long Sheer Maxi Skirt (Tutorial)

A few years ago, I asked my father, a former photographer, why he never taught me photography. He answered, "you're smart enough to figure it out yourself." He's right. I've always been good with figuring things out. My brain works nonstop—hence, the permanent stressed expression on my face and the furrowed brow that's turned into wrinkles. But that's a story for another day.

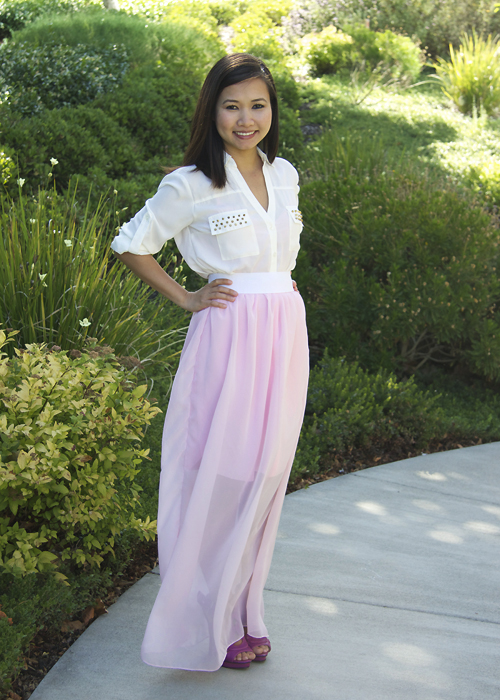
While I was in training at work, I saw a girl wearing a long and sheer yellow maxi skirt. She looked so fabulous gliding through the building. I had to have that skirt. I thought of it. I dreamt of it. I must make it. So I did.

IMG_8027 copy
*photo courtesy of my amazingly talented friend.

Chiffon fabric $3.33
Jersey knit fabric for lining $2
2" elastic $2
Stares from men and jealous glares from women ... priceless

****************************************************

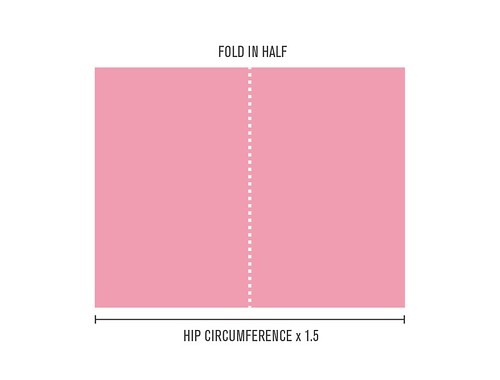
1. Take your fabric and fold in half.
The width will vary depending on your size, but the minimum should be your hip circumference x 1.5. For example, my hips measure 34" around, so 34 x 1.5 = 51". I recommend making it bigger so you can walk comfortably.

SheerSkirt-01

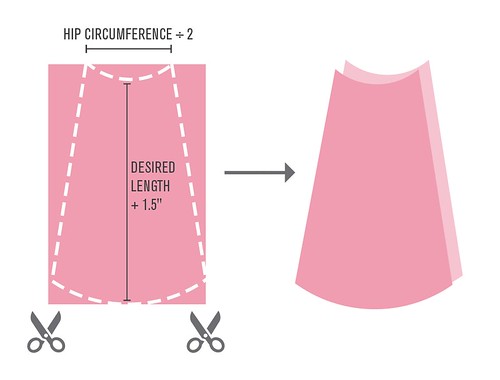
2. Cut your skirt like the image shown below.
Make sure the top and bottom are slightly curved. If not, your sides will appear to be longer than the front and back when you put the skirt on. You should have two pieces.

SheerSkirt-02

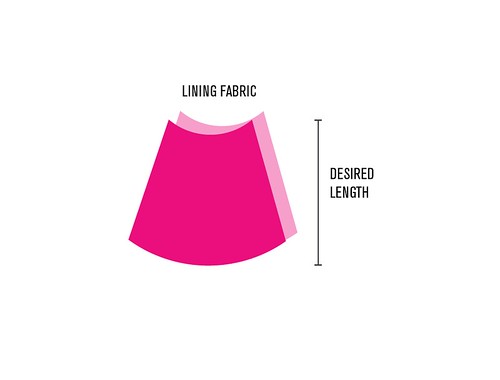
3. Cut your lining fabric in the same way, but shorter.
The length of this depends on you. I made it reach my knee for modesty's sake because I didn't want to get in trouble for dressing "inappropriately" at work.

SheerSkirt-03

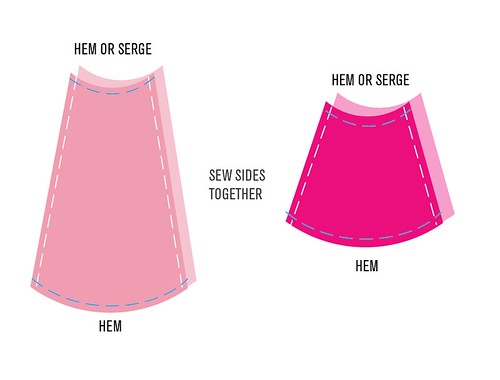
4. Hem/serge the top and hem the bottom of the 4 pieces. Sew the two sides together.
I hem everything since I don't have a serger. Knit doesn't fray easily, but chiffon is notorious for falling apart.

SheerSkirt-04


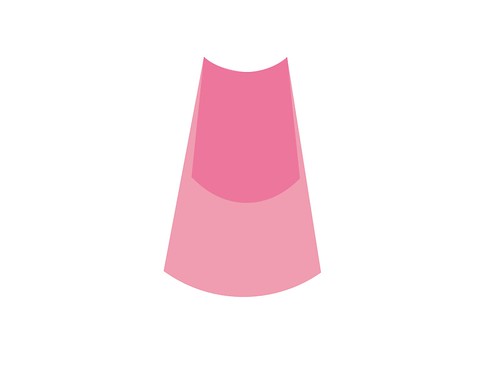
5. Place the lining inside.
I sew the lining and the chiffon fabric together at the top because it made it easier to gather later.

SheerSkirt-05

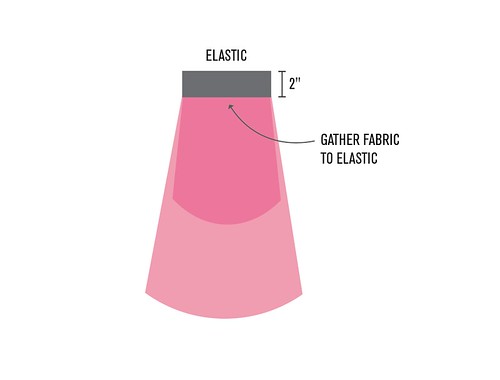
6. Cut your elastic to your waist size, then gather your skirt to the elastic.
Do not make it larger than your waist. It should sit perfectly without discomfort around your waist. Make sure when you gather your fabric that you stretch the elastic to the size of your skirt and then sew. Here's a video tutorial on how to do it.

SheerSkirt-06

7. Wear it!